R2 Presigned URL vs Public Link: How to Share Files
Last updated October 23, 2026
There are two ways to share a file from Cloudflare R2. A presigned URL gives anyone who has the link temporary access to one object, for up to 7 days. For a link that never expires, make the bucket public, ideally on a custom domain. The r2.dev development URL also works, but it’s meant for testing only.
Temporary or permanent: which one?
| Presigned URL | Public bucket | |
|---|---|---|
| Lifetime | 1 second to 7 days | Until you turn public access off |
| What it opens | One operation on one object | Every object in the bucket |
| Domain | The S3 API endpoint (<ACCOUNT_ID>.r2.cloudflarestorage.com) |
Your custom domain, or an r2.dev subdomain |
| Good for | Sending a private file to someone | Website assets, links that must keep working |
Temporary links: presigned URLs
What a presigned URL is
A presigned URL carries a signature in its query string. That signature lets anyone who has the URL perform one specific operation (such as downloading) on one specific object until it expires. Cloudflare says to treat them like bearer tokens: share them only with intended recipients, and keep the expiry short for anything sensitive.
The key facts from Cloudflare’s docs:
- Expiry: anywhere from 1 second to 7 days (604,800 seconds). You can’t make a presigned URL last longer than 7 days.
- Operations:
GET,HEAD,PUTandDELETE.POST(HTML form uploads) is not supported. For a download link, you wantGET. - Signed locally: the URL is generated with no call to R2. All you need is an R2 Access Key ID and Secret Access Key.
- Reusable: the same URL can be used many times until it expires.
- S3 endpoint only: presigned URLs work with
<ACCOUNT_ID>.r2.cloudflarestorage.comand can’t be used with custom domains. - Tamper-proof: changing the object, operation or expiry in the URL gives a
403 SignatureDoesNotMatcherror. An expired URL returns403 ExpiredRequest, and the fix is to generate a new one.
Make one with the AWS CLI
-
In the Cloudflare dashboard, go to the R2 object storage page. Under Account Details, select Manage next to API Tokens, and create a token.
-
Copy the Access Key ID and Secret Access Key right away. Cloudflare won’t show the secret again. Also note your Account ID.
-
Save the keys in a named AWS CLI profile, so they stay separate from any AWS credentials you already have. When prompted, set the region to
auto(R2 ignores it, but the CLI requires one) and the output format tojson:aws configure --profile r2 -
Generate the link.
--expires-inis in seconds, and the AWS CLI defaults to 3600 (one hour) if you leave it out. This example uses the 7-day maximum:aws s3 presign --profile r2 \ --endpoint-url https://<ACCOUNT_ID>.r2.cloudflarestorage.com \ s3://<bucket>/<key> \ --expires-in 604800 -
The command prints the URL. Send it to whoever needs the file.
Two notes:
aws s3 presignonly makesGET(download) URLs. To create an upload (PUT) URL, use an SDK.- If your bucket was created with a jurisdiction, use the matching endpoint. For the EU, that’s
https://<ACCOUNT_ID>.eu.r2.cloudflarestorage.com.
Make one with an SDK
Cloudflare documents presigning with the AWS SDKs. In JavaScript, that’s getSignedUrl from @aws-sdk/s3-request-presigner. In Python, it’s boto3’s generate_presigned_url:
import boto3

s3 = boto3.client(
    service_name="s3",
    endpoint_url="https://<ACCOUNT_ID>.r2.cloudflarestorage.com",
    aws_access_key_id="<ACCESS_KEY_ID>",
    aws_secret_access_key="<SECRET_ACCESS_KEY>",
    region_name="auto",  # required by the SDK, not used by R2
)

url = s3.generate_presigned_url(
    "get_object",
    Params={"Bucket": "<bucket>", "Key": "<key>"},
    ExpiresIn=3600,  # seconds; up to 604800 (7 days)
)
print(url)
Watch your clock
A presigned URL records when it was signed (X-Amz-Date), and its lifetime (X-Amz-Expires) counts from that moment. The URL is signed on your own machine, so your machine’s clock sets the start time. R2’s docs don’t say how much clock difference they tolerate. Before you send a link that matters, make sure your computer sets its time automatically.
Permanent links: a public bucket
R2 buckets are never public by default. Making a bucket public exposes its contents to the internet. There are two ways to do it, and you can use either one or both.
Public buckets don’t list their contents at the root of the domain. Each person you share with needs the full URL of the object.
Option 1: the r2.dev development URL
This gives the bucket a Cloudflare-managed r2.dev subdomain. To turn it on:
- In the Cloudflare dashboard, go to R2 and select the bucket.
- Select Settings.
- Under Public Development URL, select Enable.
- In the Allow Public Access? prompt, type
allowand select Allow. - Check that Public URL Access shows Allowed. The bucket’s objects are now reachable through its Public Bucket URL.
You can do the same with Wrangler:
npx wrangler r2 bucket dev-url enable <bucket>Cloudflare is explicit that r2.dev is not for production:
- It has a variable rate limit. Above it (hundreds of requests per second), requests get a
429 Too Many Requestsresponse, and bandwidth can also be throttled. - Caching, access control, WAF custom rules and Bot Management aren’t available on r2.dev. All of them need a custom domain.
- Don’t point a CNAME record at the r2.dev subdomain. Cloudflare calls that an unsupported access path.
To turn it off, select Disable under Public Development URL, type disallow, and select Disallow.
Option 2: a custom domain
For links you’ll publish, connect a custom domain to the bucket instead. The domain must be a zone in the same Cloudflare account as the bucket. If your domain’s DNS is hosted somewhere else, Cloudflare supports adding it with a partial (CNAME) setup.
- In the Cloudflare dashboard, go to the R2 object storage page and select your bucket.
- Select Settings.
- Under Custom Domains, select Add.
- Enter the domain (for example, a subdomain like
files.example.com) and select Continue. - Review the DNS record that will be added and select Connect Domain.
- Wait for the status to change from Initializing to Active. This takes a few minutes.
With Wrangler:
npx wrangler r2 bucket domain add <bucket> --domain <domain> --zone-id <ZONE_ID>A custom domain can use Cloudflare Cache. By default, only certain file types are cached, so add a Cache Everything rule if you want all files cached. You can also restrict access with Cloudflare Access or WAF token authentication. If you do, disable r2.dev too, or the bucket stays public there.
Presigned URLs don’t work on custom domains. For signed links on a custom domain, Cloudflare points to WAF HMAC validation, which needs a Pro plan or above.
To stop sharing, go to Settings → Custom Domains, select … next to the domain, and choose Disable domain.
Sharing from Buckotto
If you’d rather not use the CLI, Buckotto is a free Mac app for R2. It needs macOS 14 or later on Apple Silicon. Sharing is built in:
- Right-click a file and choose Share Link…. You can also use the Share button in the info panel.
- Temporary link: pick 1 hour, 1 day or 7 days, then click Copy Link. Signing happens on your Mac, so there’s no round trip, and the app never offers an expiry beyond R2’s 7-day limit.
- Public link (no expiry): if the bucket is public and the profile has a Cloudflare API token, a Public (no expiry) tab shows the permanent r2.dev or custom-domain URL.
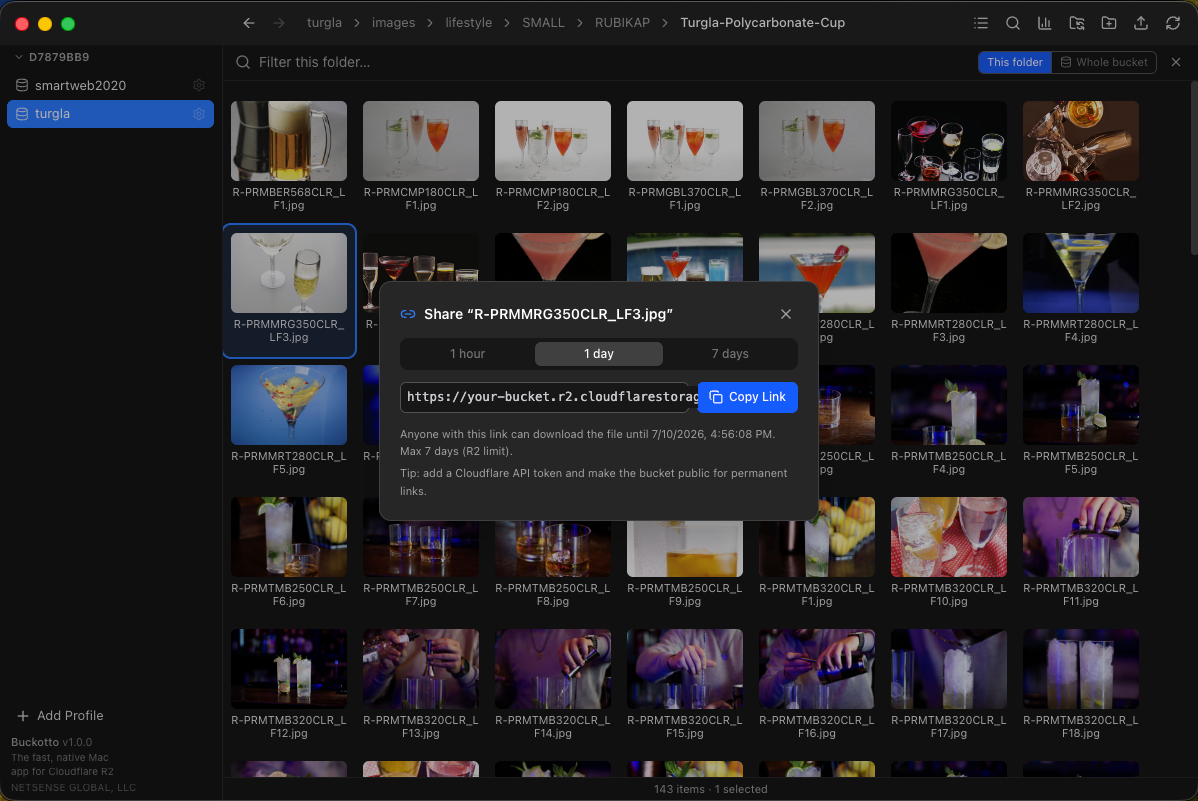
You can also make a bucket public without opening the dashboard:
- Hover the profile in the sidebar, click the pencil icon, and add a Cloudflare API token.
- Click the gear icon next to the bucket to open Bucket Settings.
- Open the Public access tab and turn on the r2.dev public URL switch.
- Confirm. The dialog warns that every object in the bucket becomes publicly downloadable.
Saving bucket settings needs a token with R2 Edit permission. Buckotto lists your existing custom domains, but adding a new one still happens in the Cloudflare dashboard. Buckotto also warns you when your Mac’s clock is wrong, because a wrong clock breaks signed links.
For other ways to work with your buckets, see browsing R2 on a Mac. To get a large file into a bucket first, see uploading large files to R2.
Which should you use?
- One file for one person: a presigned URL, as short as works (7 days at most).
- Files for a website or app: a public bucket on a custom domain.
- A quick test: the r2.dev URL. Turn it off afterward.