Upload Large Files to R2: Beyond the Dashboard Cap
Last updated October 23, 2026
To upload a file that’s too big for the Cloudflare dashboard, send it through R2’s S3-compatible API with a tool that does multipart uploads: rclone, the AWS CLI, or a desktop app like Buckotto. Wrangler only helps with files up to 315 MB. This guide covers the limits that matter, the commands for each tool, and the part-size rules R2 enforces.
Why the dashboard isn’t the tool for big files
The Cloudflare dashboard and Wrangler both talk to R2 through Cloudflare’s REST API at api.cloudflare.com, not through R2’s S3-compatible endpoint. Cloudflare’s docs say that API is rate-limited, and they point high-throughput work to the S3-compatible API or the Workers API instead.
The number most people run into is 300 MB. The dashboard’s upload screen has told users to switch to the API or Wrangler for anything larger. Cloudflare’s current docs don’t publish a dashboard figure, so check the upload screen if your file is close to that size. For large files and bulk uploads, Cloudflare’s own upload docs recommend rclone or another S3-compatible tool.
The R2 limits that matter
| What | Limit |
|---|---|
One upload request (single PUT) |
5 GiB (precisely 4.995 GiB) |
| One object, via multipart upload | 5 TiB (precisely 4.995 TiB) |
| Parts per multipart upload | 10,000 |
| Size of each part | 5 MiB to 5 GiB |
wrangler r2 object put |
315 MB, one object at a time |
Cloudflare suggests a single PUT for files under about 100 MB, and multipart for anything larger or anything you can’t afford to restart from zero.
Multipart upload basics
A multipart upload splits one file into parts, uploads the parts (often several at once), then asks R2 to join them into a single object. If a part fails, only that part is sent again, not the whole file.
R2’s rules for parts:
- Every part except the last must be at least 5 MiB.
- No part can be larger than 5 GiB.
- An upload can have at most 10,000 parts.
- All parts except the last must be the same size.
- Uploads that never finish are aborted automatically after 7 days by default. A lifecycle rule on the bucket can change that.
The part count caps how big a file can get at a given part size. At the 5 MiB minimum, 10,000 parts cover about 48 GiB. For bigger files, use a part size of at least the file size divided by 10,000. A 200 GB file, for example, needs parts of 20 MB or more.
Part size also affects cost. Each part counts as a separate Class A operation, and a multipart upload always uses at least three operations (create, upload part, complete). Bigger parts mean fewer operations, but a failed part takes longer to resend.
You rarely manage parts by hand. rclone and the AWS CLI switch to multipart automatically above a size threshold and split the file into parts of one configured size.
Option 1: Wrangler (files up to 315 MB)
Wrangler is Cloudflare’s developer CLI. It’s handy for a quick upload from the terminal, but it caps files at 315 MB and uploads one object at a time.
-
Log in to your Cloudflare account:
npx wrangler login -
Upload the file. Since Wrangler v4,
r2 objectcommands use local storage by default, so add--remoteto write to your real bucket:npx wrangler r2 object put <bucket>/<key> --file=<path/to/file> --remote
For anything bigger, use one of the options below.
Option 2: rclone
rclone is a command-line tool for cloud storage. Cloudflare’s docs use it for large uploads, and it handles multipart for you.
-
In the Cloudflare dashboard, go to R2 object storage, select Manage next to API Tokens, and create a token. Copy the Access Key ID and Secret Access Key. The secret is shown only once.
-
Install rclone v1.59 or later. Older versions can fail on R2 with
HTTP 401: Unauthorized. -
Run
rclone config. Create a remote namedr2, choose Amazon S3 Compliant Storage Providers, then Cloudflare R2 Storage, and enter your keys and endpoint. The result looks like this:[r2] type = s3 provider = Cloudflare access_key_id = <ACCESS_KEY_ID> secret_access_key = <SECRET_ACCESS_KEY> region = auto endpoint = https://<ACCOUNT_ID>.r2.cloudflarestorage.com acl = privateIf your token is scoped to specific buckets (Object Read & Write), also add
no_check_bucket = true. -
Upload the file and watch its progress:
rclone copy <path/to/file> r2:<bucket>/ -P
rclone switches to multipart above --s3-upload-cutoff (default 200 MiB). It uses parts of --s3-chunk-size (default 5 MiB) and sends --s3-upload-concurrency parts at once (default 4). For files of known size, it raises the part size automatically to stay under 10,000 parts. To use bigger parts, set both size flags:
rclone copy <path/to/file> r2:<bucket>/ -P --s3-upload-cutoff=100M --s3-chunk-size=100MOption 3: The AWS CLI with the R2 endpoint
The AWS CLI works with R2 once you point it at your account’s R2 endpoint.
-
Create an R2 API token as in the rclone steps above.
-
Save the keys in a separate profile, so they don’t replace any AWS credentials you already use. Enter
autoas the region:aws configure --profile r2 -
Upload the file:
aws s3 cp <path/to/file> s3://<bucket>/<key> \
  --endpoint-url https://<ACCOUNT_ID>.r2.cloudflarestorage.com \
  --profile r2
aws s3 cp switches to multipart at multipart_threshold (default 8 MB) and uses parts of multipart_chunksize (default 8 MB), with up to 10 requests in flight (max_concurrent_requests). At 8 MB per part, 10,000 parts cover roughly 80 GB. For bigger files, set a larger part size:
aws configure set s3.multipart_chunksize 64MB --profile r2Option 4: Buckotto, a Mac app for R2
If you’d rather drag and drop than type commands, Buckotto is a free Mac app for Cloudflare R2. It needs macOS 14 or later and runs on Apple Silicon. Its uploads follow R2’s multipart rules:
- Large files upload as fixed-size parts in parallel, and every part except the last is exactly the same size.
- If the app quits or crashes mid-upload, the job comes back as paused when you reopen it. Resume sends only the missing parts.
- Brief network failures are retried automatically, and one failed file doesn’t stop the rest of the queue.
- Progress is byte-accurate, with a live transfer rate for each file and overall.
- Canceling an upload cleans up the multipart upload on the server, so you aren’t billed for orphaned parts.
- With a Cloudflare API token on the profile, the bucket’s settings can add a lifecycle rule that aborts incomplete multipart uploads after a number of days you choose.
To upload with Buckotto:
-
Create an R2 API token as in the rclone steps above, and note your Account ID from the R2 overview page.
-
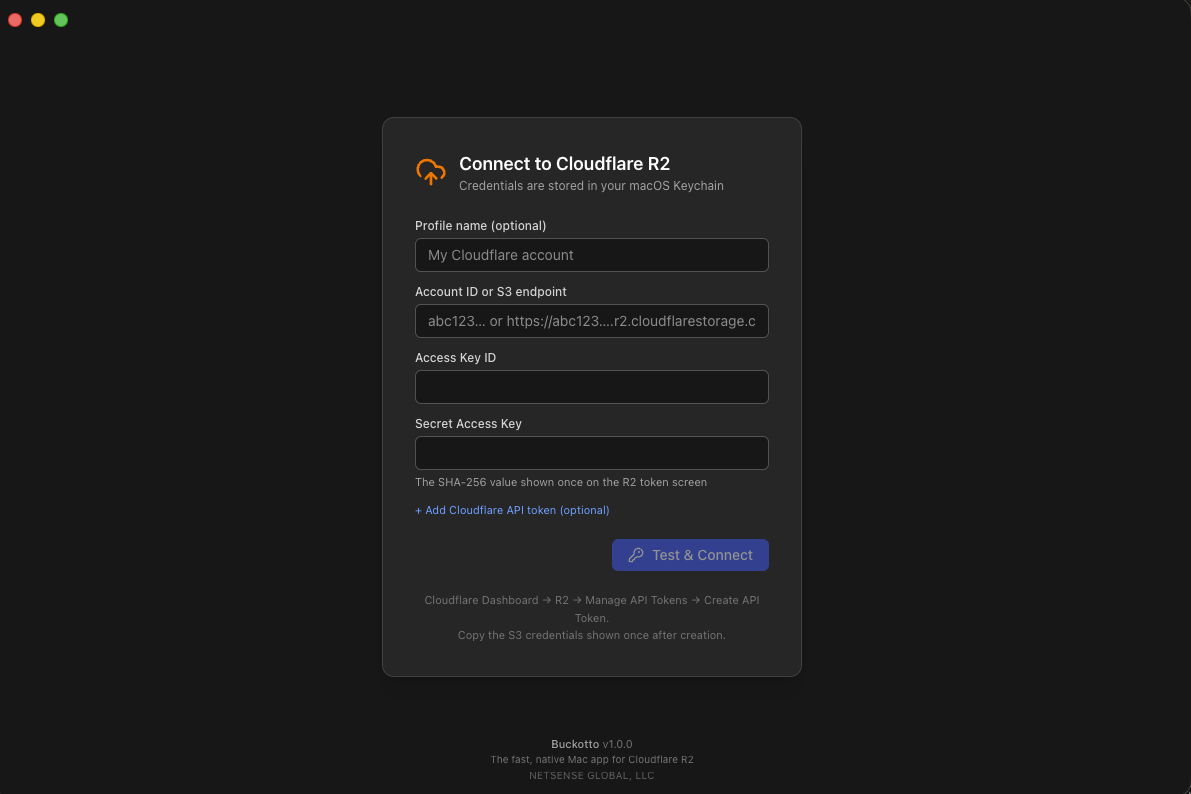
Open Buckotto. On the Connect to Cloudflare R2 screen, paste your Account ID (or the full S3 endpoint URL), the Access Key ID and the Secret Access Key, then click Test & Connect. The secret is stored in the macOS Keychain.
-
Click your bucket in the list on the left side of the window.
-
Drag files or folders from Finder onto the window, or click the upload button (an arrow pointing up out of a tray) at the top right. Folders upload with their structure intact.
-
If some files already exist in the bucket, choose Overwrite or Skip once for the whole batch.
-
Follow the transfer bar at the bottom of the window. Click it to see each file’s progress.
Buckotto is built for hands-on work on a Mac. For uploads in a script or a CI pipeline, rclone or the AWS CLI fits better. For more ways to work with buckets on macOS, see how to browse R2 on a Mac.
Which method should you use?
- A file the dashboard accepts: the dashboard is fine.
- Up to 315 MB, from a terminal: Wrangler.
- Scripts, CI, or very large files: rclone or the AWS CLI.
- Drag and drop on a Mac, with resumable uploads: Buckotto.
If a Mac app can browse your bucket but its uploads fail, it may be streaming them with chunked transfer encoding. R2 needs a Content-Length header on every upload and answers MissingContentLength (HTTP 411) without one. Every method above sends it.
Sources
- Cloudflare R2: Upload objects
- Cloudflare R2: Limits
- Cloudflare R2: API overview
- Cloudflare R2: Authentication (API tokens)
- Cloudflare R2: Error codes
- Cloudflare R2: rclone example
- Cloudflare R2: aws CLI example
- Wrangler: R2 commands
- Wrangler: General commands (login)
- Wrangler: Migrate from v3 to v4
- cloudflare-docs issue #5011 (quotes the dashboard’s 300 MB message)
- rclone: Amazon S3 (incl. Cloudflare R2)
- rclone: Global flags
- AWS CLI: S3 configuration
- AWS CLI: aws s3 cp
- AWS CLI: aws configure